
This guide describes how to set up AWS IoT Core with an FP-I4C unit.
Version: 1.0.0, Date: 2023.02.08. Description of change: Initial version
The newly developed unit FP-I4C is the communicator for automation. Acting like a data collector, the FP-I4C connects programmable controllers to the distributed control system, enabling remote access even for small systems. Thanks to its wide range of functions, such as an integrated web server and FTP client, and thanks to its compact design, the communication unit is the ideal complement for programmable controllers without Ethernet capability.
Please refer to our product Web site.
FP-I4C hardware
Power supply cable
24V DC power supply
Internet connectivity
Please refer to our product Web site.
There are two ways to connect the FP-I4C unit to AWS IoT:
Using the HMWIN Studio IDE (supports Windows Vista, 7, 8, 10, and Server 2003).
Using a PLC with the example provided by the FP-I4C unit.
We recommend the first method as it is the quickest and easiest. The following instructions are based on this method.
HMWIN Studio can be downloaded from our Web site. Or go to https://industry.panasonic.eu/downloads and search for "HMWIN Studio". You must use version 4.0.1 Build 507 or higher.
Connect the power supply cable to 24VDC and to the FP-I4C unit. For further information on the hardware set-up of the device please refer to the Installation instructions.
The FP-I4C has two Ethernet ports. The upper one (ETH0) is set to DHCP by default. The lower one (ETH1) is set to a fixed IP address (192.168.0.1) by default.
Go to .
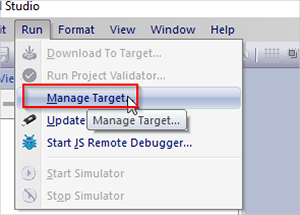
Select Board to display a list of all devices found in the network.
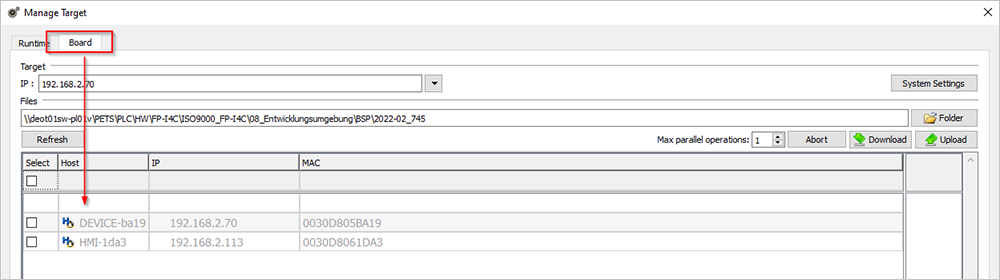
To make sure that it is the correct device, compare the MAC address with the one printed on your device. Note that ETH0 and ETH1 have different MACs.
To set up your AWS account, refer to the online AWS documentation.
Follow the steps outlined in the sections below to create your account and a user and get started.
Pay special attention to the notes.
To create AWS IoT resources, refer to the online AWS documentation.
Follow the steps outlined in the sections below to create an IoT policy for your device certificate and an object in the AWS IoT registry.
Pay special attention to the notes.
Download the demo example  for HMWIN Studio.
Open the demo with HMWIN Studio.
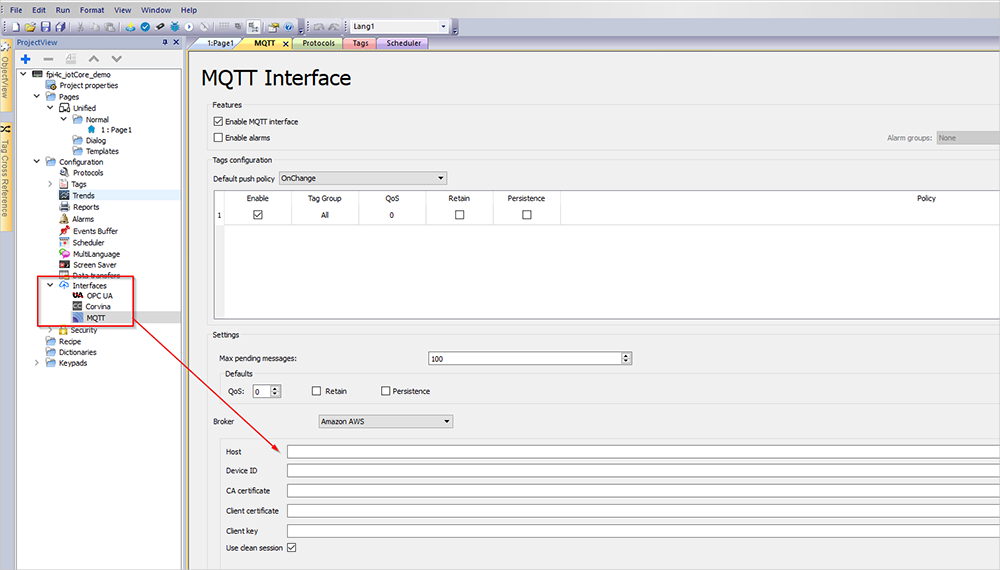
Select and enter the information obtained in the previous step Create resources in AWS IoT (host, device ID, and all certificate files).
Make sure that your device is switched on and connected to the network.
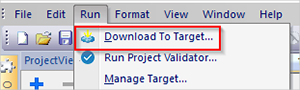
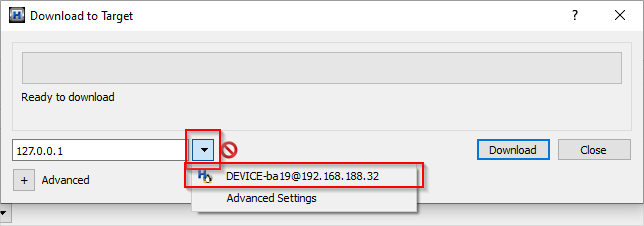
Select .
Select your device from the list.
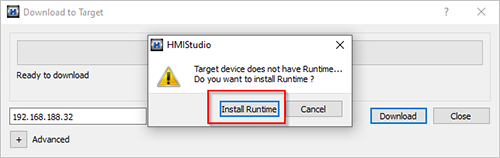
You will receive a message that the Runtime is not installed. Select Install Runtime to install the software. This may take a few minutes. After the installation the device will automatically reboot.
After the device has rebooted, select again and wait until the device is listed. If the device is not listed, it means that it is still rebooting. When it appears in the list, select Download.
Once the project has been downloaded, the application will run and a tag named "Tag1" will be transferred. This tag is incremented every second. You should now see this tag on AWS.
In case the demo app is not working, please check following things:
Is Internet connectivity available?
Is a proxy or outgoing port blocking the connection?
Is the AWS policy set correctly to allow the device to connect and communicate?
Is the time set correctly?
To check the time, go to https://ip_of_device/machine_config. Replace ip_of_device with the IP address of your device (e.g. 192.168.188.32). Select Date &Time, check the time, and correct it if necessary.
Check the log file.
To check the log file go to https://ip_of_device/machine_config. Replace ip_of_device with the IP address of your device (e.g. 192.168.188.32). Select Logs and then Save to download the log file. Unzip the file and check the file's “messages” in a text editor (e.g. Notepad++). They can give you some hints for troubleshooting.
It is also possible to view the logs live on the device through SSH:
Go to https://ip_of_device/machine_config. Replace ip_of_device with the IP address of your device (e.g. 192.168.188.32). Select , and click Edit in the top right corner to enable the service. Save your settings. Use an SSH client (e.g. Putty or Powershell) to connect to the device. When the device is connected, enter the command tail -f /var/log/messages to view the logs.